
How to Photograph the 2026 and 2027 Solar Eclipses in Spain: The Complete Guide
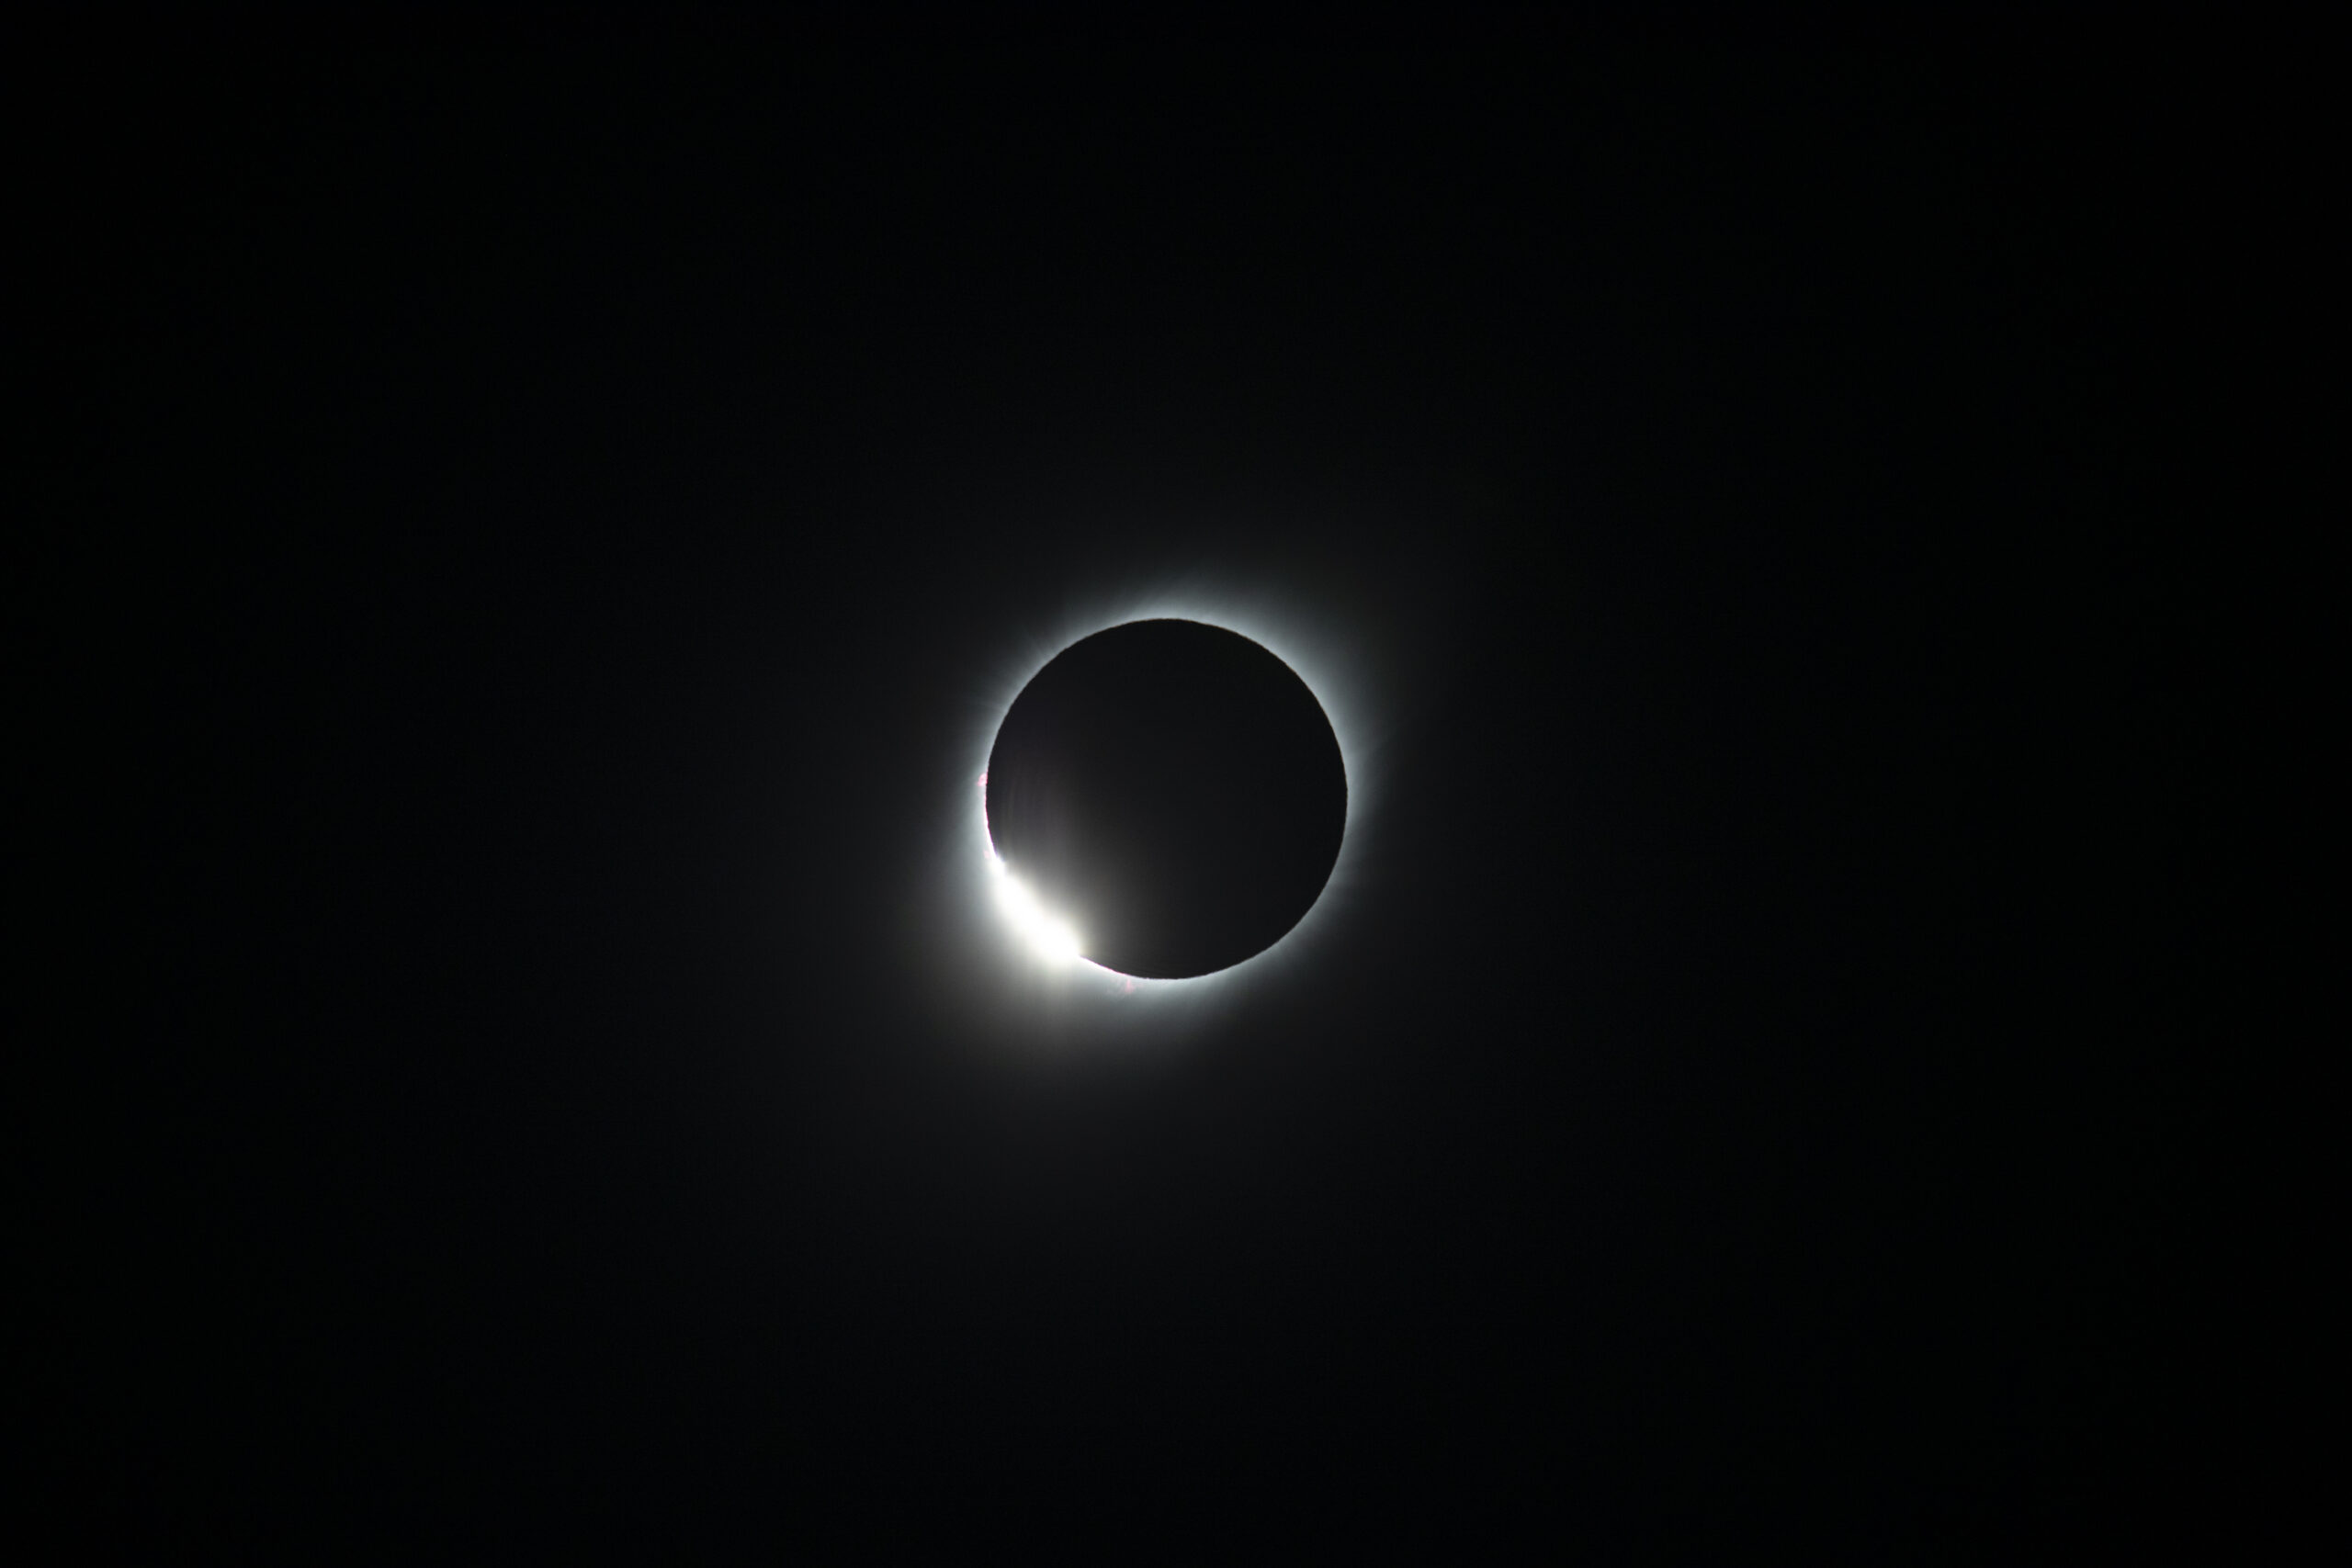
Between August 12, 2026, and August 2, 2027, Spain is about to experience something that hasn’t happened in over a hundred years: two total solar eclipses in consecutive years. The first will sweep across the northwest and north-central Peninsula near sunset; the second, considered one of the longest of the century, will darken Cádiz, Ceuta, and Melilla mid-morning. These are two events — but also two completely different photographic challenges.
This guide brings together everything you need to prepare your camera, cross-checked against official sources such as Spain’s National Geographic Institute (IGN), NASA, and the American Astronomical Society (AAS): eye and equipment safety, camera types and lenses, settings for each phase of the eclipse, and the key differences between the two events.
Important note: the timings and totality paths in this article reflect the best official estimates available at the time of publication. Always verify the exact time for your specific location in the weeks leading up to each eclipse, as small path and timing refinements are common as the date approaches.
This guide is written from firsthand experience: three total solar eclipses photographed in person — August 21, 2017, and April 8, 2024, in the United States, and July 2, 2019, in La Serena, Chile — plus dedicated photography trips organized around each of those events. Every eclipse teaches something different about logistics, light, and crowd behavior, and a good part of the advice in this article comes straight from that field experience.
Two eclipses, two very different beasts
Before talking cameras, it’s worth understanding why these two eclipses call for such different strategies. According to the IGN, the 2026 event is the first total eclipse visible from mainland Spain in over a century — the next one won’t arrive until 2053. The 2027 eclipse, meanwhile, is already being referred to in international media as the “eclipse of the century” because of its exceptional duration.
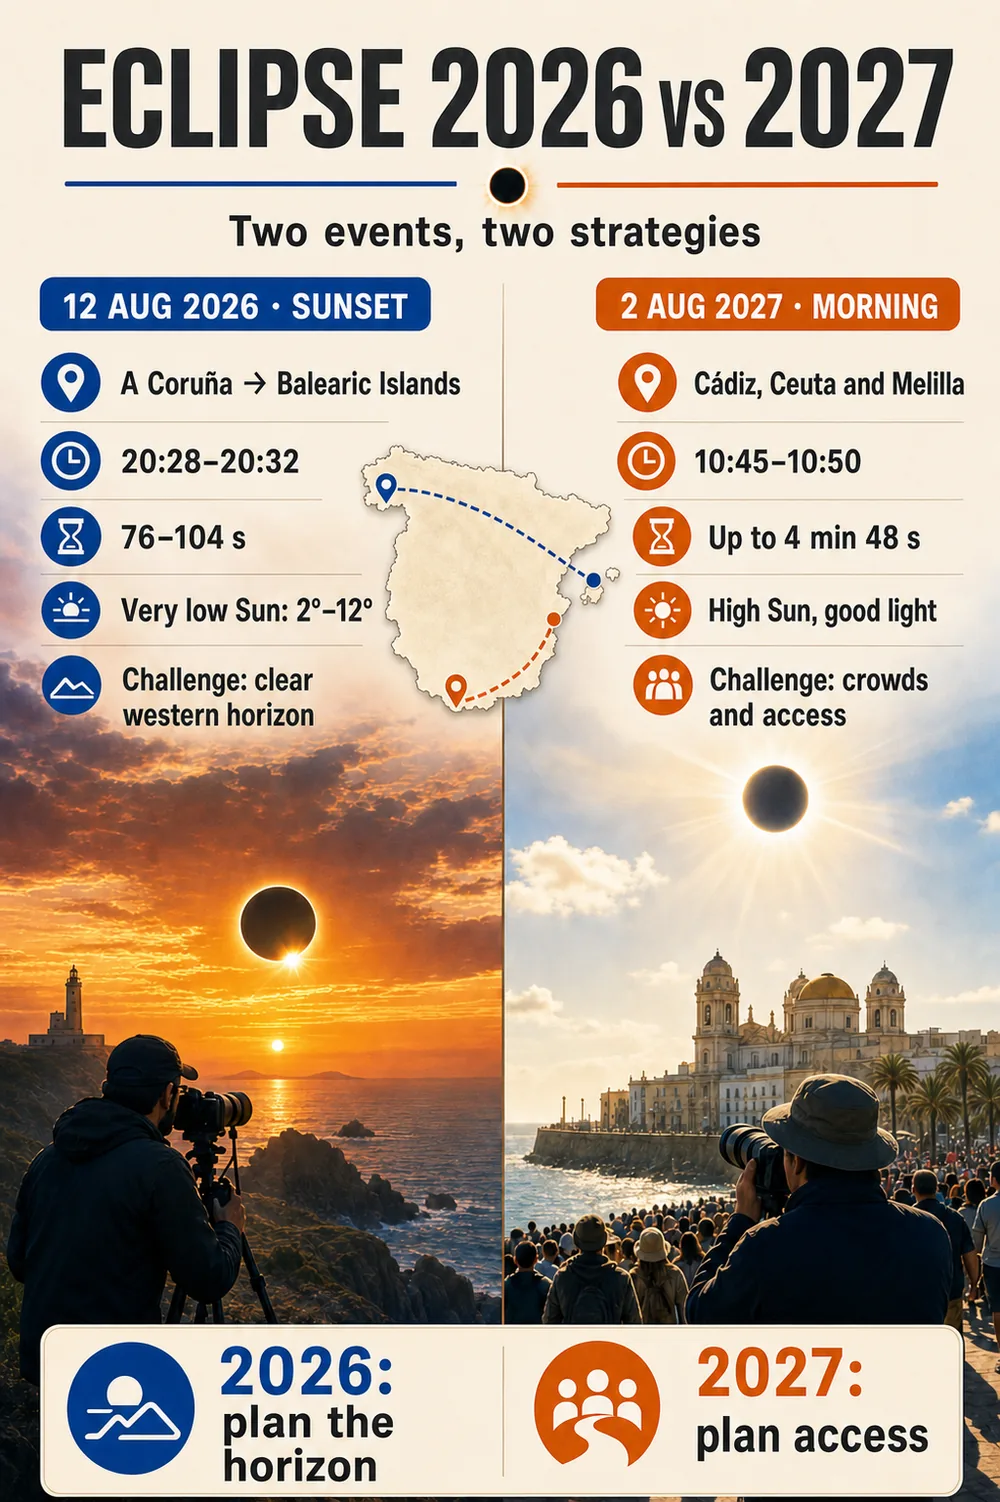
August 12, 2026: the sunset eclipse
This total eclipse crosses Spain from west to east, entering near A Coruña and exiting over the Balearic Islands, passing near cities such as Oviedo, León, Burgos, Vitoria, Logroño, Zaragoza, Teruel, Castellón, and Valencia, according to IGN data. Totality happens very close to sunset, with the Sun only 12° above the horizon in A Coruña and just 2° in Palma — making this a true “sunset eclipse.”
Totality is brief: roughly 76 seconds in A Coruña and up to 104 seconds in Burgos, according to NASA and the IGN. Outside that narrow path, the rest of Spain (Madrid, Barcelona, Seville, Málaga…) will only see a partial eclipse, with the Moon covering part of the Sun’s disc.
The main photographic challenge here isn’t so much totality technique as horizon logistics: you’ll need a location with a clear, unobstructed view to the west, free of mountains, buildings, or trees, since the Sun will sit almost on the horizon.
August 2, 2027: the eclipse of the century
A year later, on August 2, 2027, the path of totality will sweep across southern Spain: nearly the entire province of Cádiz, Ceuta, Melilla, part of Málaga, and areas of southern Granada and Almería, according to the IGN. This time totality falls mid-morning (roughly between 10:45 and 10:50 a.m. mainland Spain time), with the Sun high in the sky and much more comfortable light for photography.
The most striking difference is duration: up to 4 minutes and 48 seconds of totality in Ceuta and 2 minutes 54 seconds in Cádiz — far beyond the roughly one-and-a-half minutes of 2026. Globally, this eclipse will peak at 6 minutes 23 seconds over Egypt, making it one of the longest total solar eclipses of the 21st century. Outside the path of totality, the rest of Spain (including the Canary Islands) will see at least 70% obscuration.
Here, the challenge isn’t the horizon — it’s crowds. Southern Spain is expected to see a huge influx of visitors and international tourists, putting real pressure on roads, accommodation, and mobile network coverage.
Safety: the part with no shortcuts
Before we get to a single camera setting, let’s be clear: looking directly at the Sun, even when it’s 99% eclipsed, can cause permanent eye damage within seconds. The same goes for your camera’s sensor or your smartphone. NASA and the American Astronomical Society are unambiguous about this.
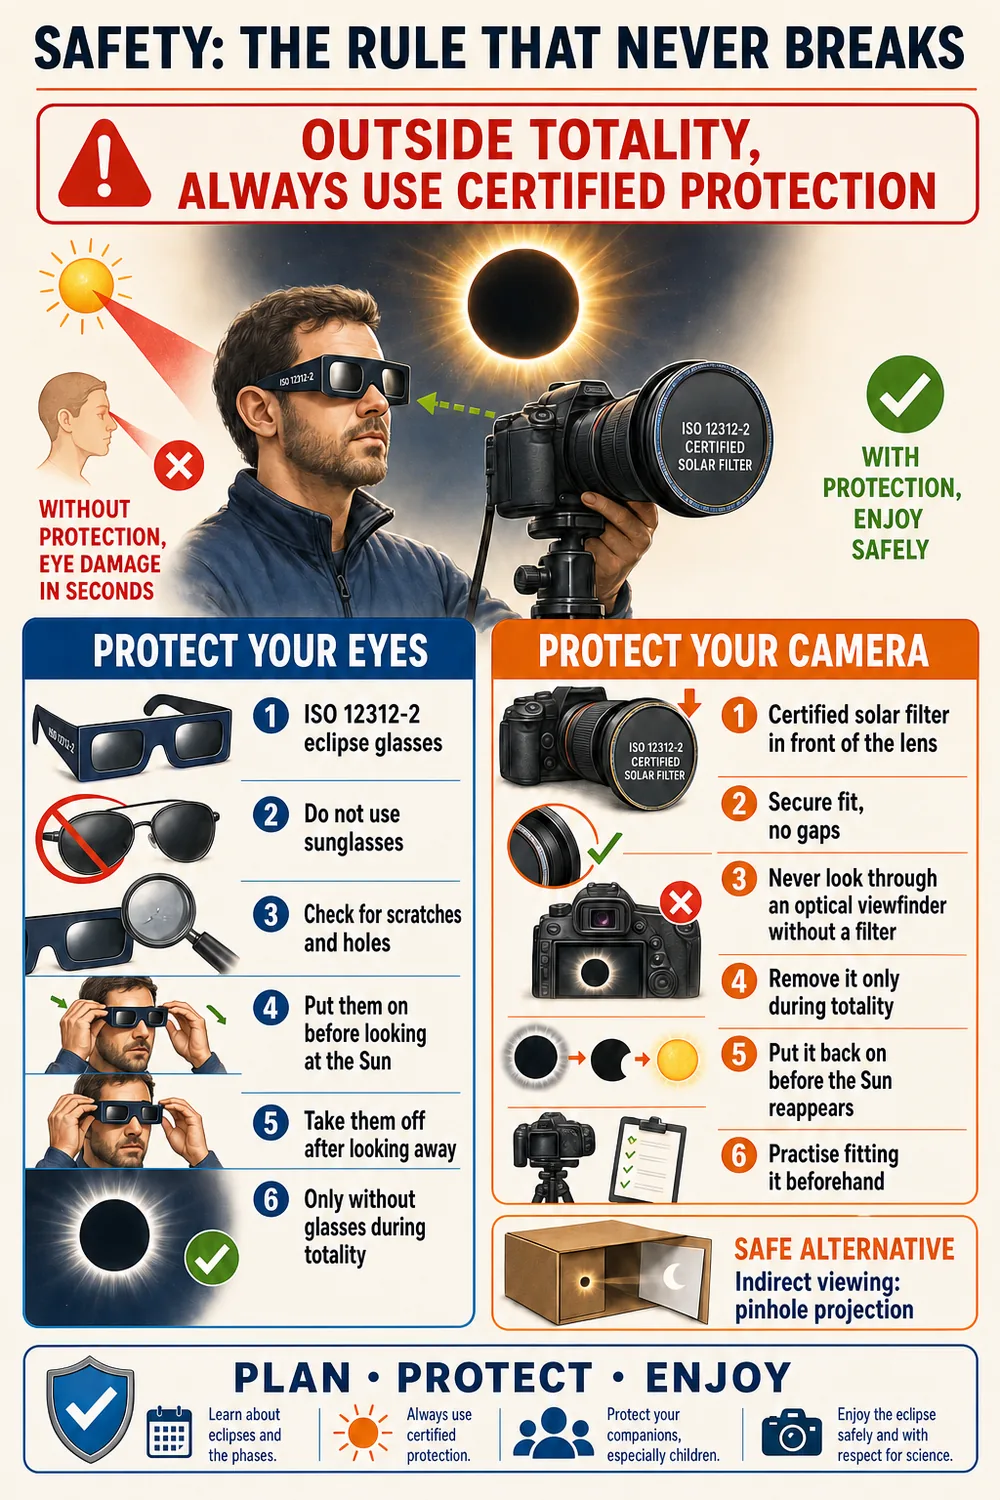
Eye protection: the ISO 12312-2 standard
The only safe eclipse glasses are those that meet the ISO 12312-2:2015 standard, as verified by the AAS. This standard caps light transmission at a maximum of 0.0032% (equivalent to a shade-12 welding filter) — far below what ordinary sunglasses let through, which “pass hundreds to thousands of times more light than is safe for looking directly at the Sun,” according to the AAS itself.
A few practical tips before buying or using eclipse glasses:
- Buy from a trusted seller and be wary of “ISO certified” labels with no accredited lab report behind them — the AAS warns that such labels alone guarantee nothing.
- Check the lenses for scratches, pinholes, or damage before every use.
- Put them on before looking at the Sun, and take them off only after you’ve looked away.
- The only time you can look at the Sun without protection is during the minutes of total totality, and only if you’re physically inside the path of totality. The instant the first flash of sunlight reappears, protection goes back on.
- If you don’t have certified glasses, the safe alternative is indirect viewing: pinhole projection onto a surface, or binocular projection.
Protecting your camera and lens
Just like your eyes, your camera needs a certified solar filter (OD5 optical density, roughly a 1/100,000 light-reduction factor) mounted on the front of the lens during every partial phase — and, in the case of an annular eclipse, for the entire event. A few key points:
- The filter must fit snugly on the lens, with no gaps that could let direct light reach the sensor.
- Never look through a DSLR’s optical viewfinder without the filter attached — use Live View instead.
- During a total eclipse, the filter is only removed during the minutes of totality (between second and third contact) and must be reattached before the Sun reappears.
- Do a full dry run of attaching and removing the filter before eclipse day — there’s no time to improvise once the event is underway.
Camera gear: essential vs. ideal
According to NASA itself, eclipse photo quality depends far more on the photographer’s skill than on the gear — a professional DSLR and a well-prepared smartphone can both produce remarkable results. That said, more focal length and more manual control give you a better shot at capturing detail in the solar corona, Baily’s beads, or the diamond ring.
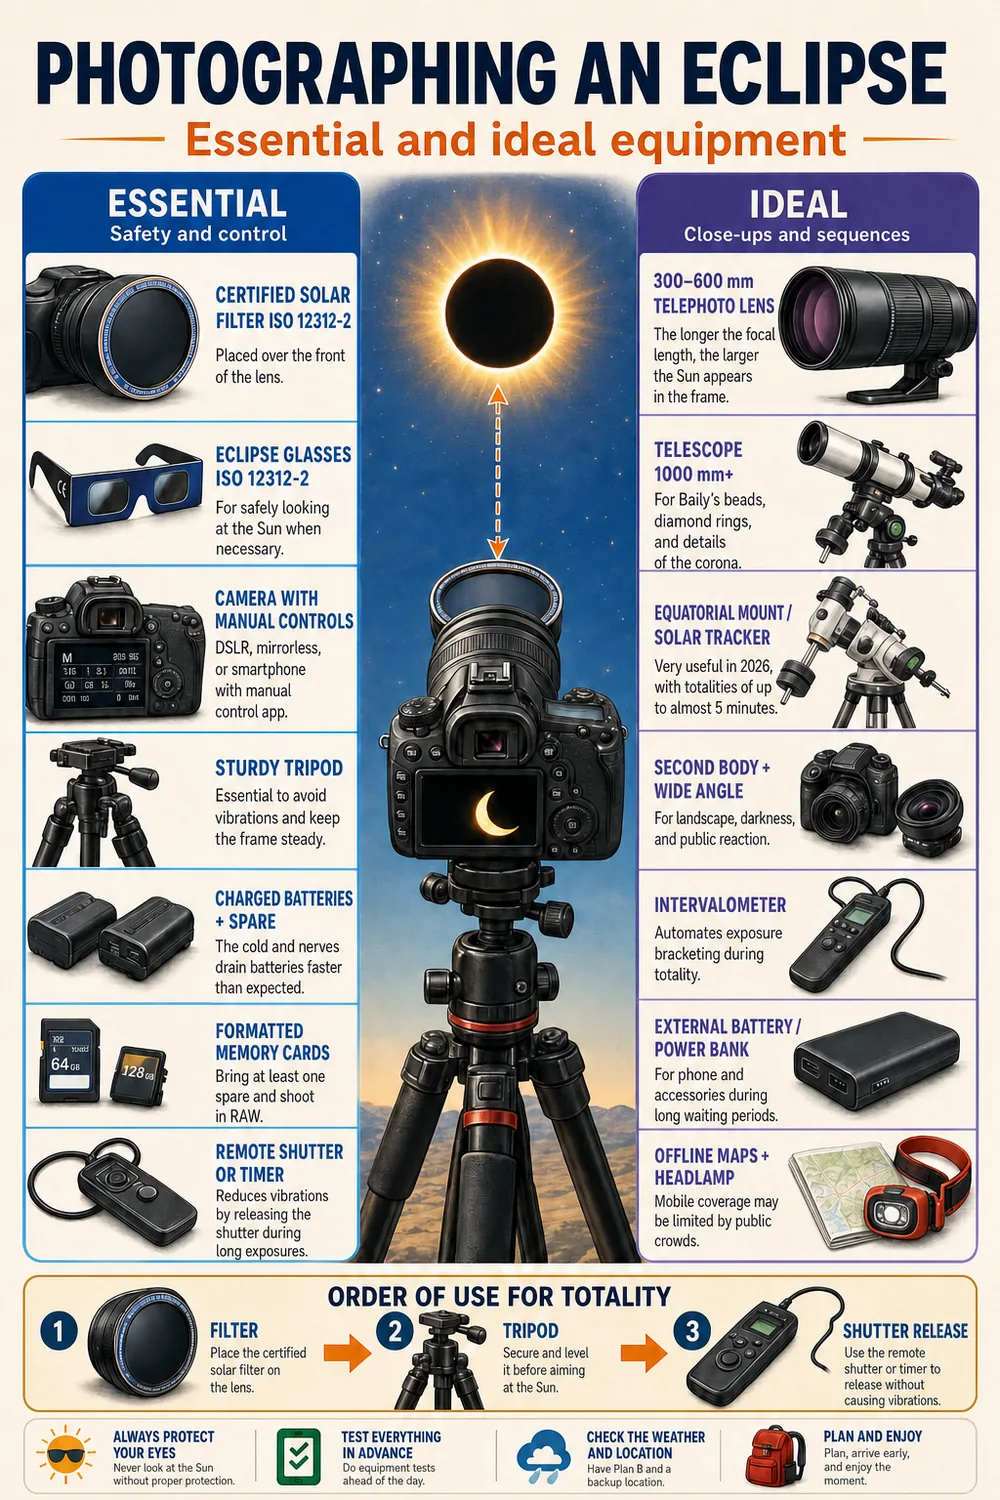
Camera types
Any of the following will work, with different results:
- DSLR or mirrorless with interchangeable lenses: the option recommended by the AAS for close-ups of the solar disc and corona, especially with full manual control over ISO, aperture, and shutter speed.
- Compact or bridge camera with zoom: fine for wide shots if it has manual controls, though limited for quality close-ups.
- Smartphone: perfectly valid, especially for video, wide shots, and capturing the atmosphere. It needs a dedicated solar filter for the phone, ideally paired with an auxiliary telephoto lens or telescope adapter, plus an app with manual exposure control.
- Telescope with a photo adapter: the most detailed option, best suited to those with prior experience, for close-ups of solar prominences and corona structure.
Lens and focal length
Focal length directly determines how large the Sun appears in your frame:
- 10–50mm (wide/normal): capture the landscape and atmosphere, but render the Sun as a tiny dot. Great for “eclipse effect on the landscape” shots, not for the solar disc itself.
- 300mm or longer: the minimum recommended by specialist guides such as the AAS’s for a reasonably sized solar disc with some detail during the partial phases.
- 1,000mm or longer (telescope range): needed to capture Baily’s beads, the diamond ring, and fine corona structure in detail.
A tip from specialists: take test shots (with your filter attached) days before the eclipse to see exactly how large the Sun appears in your frame with your specific camera-and-lens combo.
Essential accessories
- A sturdy tripod: essential with long telephoto lenses, where any vibration is magnified.
- Remote shutter release or self-timer: reduces camera shake, especially during totality’s longer exposures.
- Charged batteries plus a spare, and formatted memory cards: as AAS guides note, bring everything ready and tested — you may have no way to source anything last-minute at the eclipse site.
- Gaffer or masking tape: to lock the focus ring and zoom once set to manual, preventing accidental drift.
Technique: photographing every phase of the eclipse
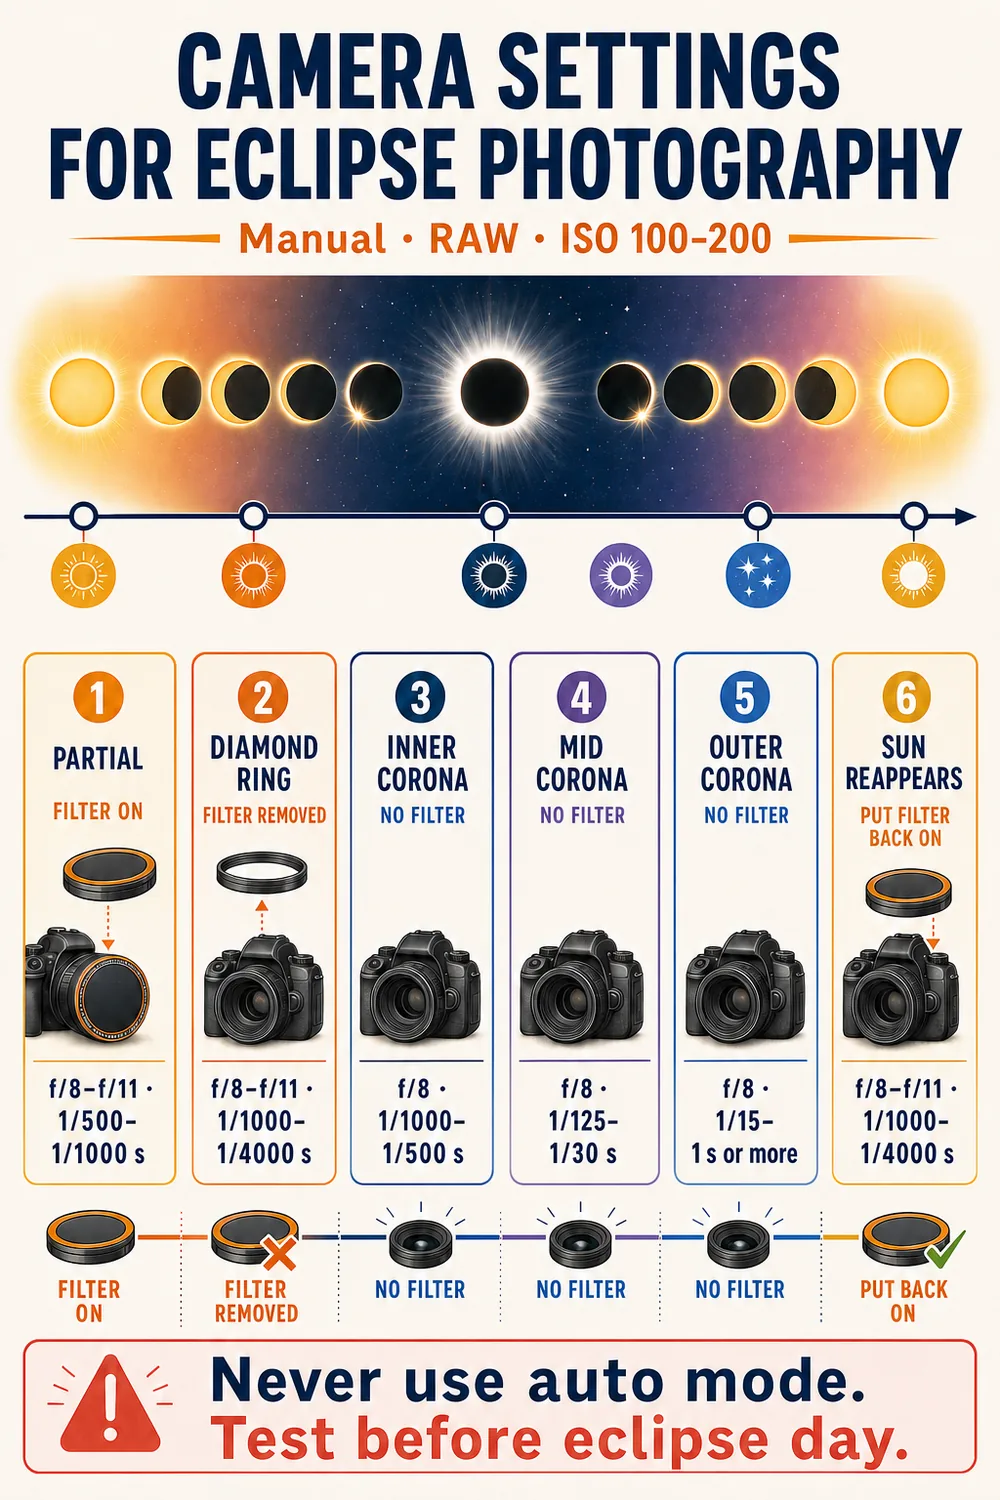
The technical crux of a total eclipse is that scene brightness changes extremely fast — from ordinary daylight to near-nighttime darkness during totality, then back again, all within a few minutes. That’s why both NASA and the AAS agree on one piece of advice: shoot in full manual mode, with fixed ISO and aperture, varying only the shutter speed — and never leave the camera on auto.
Before eclipse day
- Practice with your full setup by photographing the Sun (always with the filter attached) to dial in focus and exposure.
- Always use manual focus — autofocus usually struggles with a filtered solar disc. Focus on the Sun’s edge or a visible sunspot, then lock the focus ring with tape.
- Shoot in RAW whenever possible, for more room to recover detail in post.
- Run at least one full rehearsal of the whole process, including removing and reattaching the filter, before the actual day.
Partial phase (before and after totality)
With the solar filter always attached, the Sun’s brightness stays fairly constant through most of the partial phase. A rough starting point: ISO 100–200, f/8–f/11, and shutter speeds of 1/500 to 1/1000 s — always fine-tuned with your own test shots.
Seconds before totality: the diamond ring and Baily’s beads
Just before the Moon fully covers the Sun, the “diamond ring” and “Baily’s beads” briefly appear (flashes of sunlight filtering through valleys in the lunar terrain). This is the moment to remove the solar filter, still using very fast shutter speeds (1/1000 to 1/4000 s), since residual brightness is still intense.
Totality: the only filter-free moment
During the seconds or minutes of total totality — and only if you’re inside the path of totality — it’s safe to photograph without a solar filter, and it’s also the only time you can look directly without eye protection. This is where exposure bracketing comes in: as both NASA and the AAS recommend, no single exposure can capture the corona’s full dynamic range, so you’ll want to shoot a full sequence — from 1/1000 s (for the inner corona and prominences) to 1 second or longer (for the much fainter outer corona).
The sequence recommended by specialist eclipse photographers: adjust your settings about a minute before second contact, remove the filter and capture the diamond ring, run through your full bracketing sequence, and — very importantly — set aside a few seconds to watch totality with your own eyes, camera aside. No photograph replaces the real experience.
The Sun reappears
The moment totality ends and the first flash of light reappears (third contact), reattach the solar filter immediately — on both your camera and your eyes — and go back to your partial-phase settings.
Where to shoot in Spain: cloud cover and location
Historical climatology plays a decisive role here, since “a cloud hundreds of kilometers away can ruin the eclipse” if it blocks the Sun at the exact moment of totality. Based on the IGN’s analysis of 16 years of AEMET weather data:
- For 2026: the Cantabrian coast has a lower probability of clear skies (30–50% clear-sky frequency), while inland areas such as Castilla y León, Castilla-La Mancha, and the Ebro valley offer statistically better odds.
- For 2027: southern Spain (Cádiz, Málaga, Granada, Almería) has historically low cloud probability, with slightly higher humidity in western Cádiz due to Atlantic airflow. The mid-morning timing also favors observation.
These statistics are only a reference — follow the real forecast in the days beforehand and, if possible, have a backup location within the path of totality in case the sky doesn’t cooperate at your first choice.
For the 2026 eclipse, beyond cloud cover, remember the added constraint of the Sun’s low altitude: you’ll need a clear western horizon, free of mountains, buildings, or vegetation. For 2027, the main constraint will be crowding in the southern totality zones, so book accommodation and plan your route well in advance.
Beyond the solar disc: don’t forget the rest of the scene
One of the tips NASA repeats most often, through photographer Bill Ingalls, is not to obsess solely over close-ups of the Sun. During totality, the landscape lights up in a strange way, with twilight tones along the entire horizon at once. It’s worth setting aside shots for:
- The overall landscape and the shifting light across it.
- The natural “crescent moons” projected by gaps between tree leaves during the partial phase.
- People’s reactions as they watch the eclipse — the human experience of the moment is often as memorable as the astronomical image itself.
- Video with ambient audio: many photographers agree the sound of the crowd during totality is as powerful as the image.
Final checklist before you head out
- Certified ISO 12312-2 solar filter, well-fitted to your lens.
- Certified ISO 12312-2 eclipse glasses for every person in your group.
- A camera with manual control, tested beforehand with your complete setup.
- Tripod and, if possible, a remote shutter release.
- Charged batteries plus a spare, formatted memory cards with free space.
- Location chosen in advance: clear horizon for 2026, an access and parking plan for 2027.
- Weather forecast checked in the days before, with a backup plan if possible.
- Offline maps downloaded, in case mobile coverage gets overloaded.
- A few minutes set aside to watch the eclipse without a camera — just your own (protected) eyes.
Sources
- IGN — Total solar eclipse of August 12, 2026
- IGN — Total solar eclipse of August 2, 2027
- IGN — Weather information for the 2026–2028 eclipses
- NASA Science — Total Solar Eclipse on August 12, 2026
- NASA — Five Tips for Photographing a Total Solar Eclipse
- American Astronomical Society — About the ISO 12312-2 Standard
- American Astronomical Society — How to Shoot Solar-Eclipse Images & Videos